
Group lists
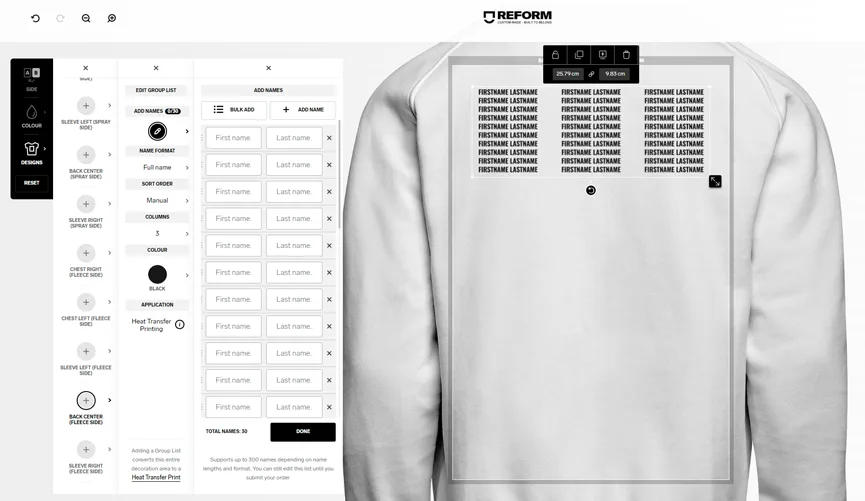
The Group List Tool provides simple features to allow you to upload or manually add a list of names for display. It also allows you to change column numbers, adjust the sorting order of your names, and more.
Note: Group lists are only available on the Back or Inside Lining decoration areas.
Adding a group list to your design
You can add a group list to your design using the Group List Tool in the Design Lab.
From the menu select DESIGNS, select your decoration space, then select ADD GROUP LIST.
Choose between adding just a list of names or using one of our templates that has banners as well as the list of names.
A group list template showing FIRSTNAME LASTNAME will populate on your design
Select ADD NAMES to the names of your group manually or via CSV/Excel file upload. See below for detailed instructions.
You may need to adjust the size, number of columns, or the name format to ensure your list fits correctly. See Group List Design Tools below for more information.
Upload your group list from a CSV or Excel file
Add your group list to our template and save.
Select the group list template on your design. This is the area where you can see 'firstname, lastname'.
Select ADD NAMES.
Select BULK ADD.
Drag and drop or select 'browse to files' to import your file.
Once your file name appears in the box, select IMPORT.
Use the dropdown to select which column contains your group's first names and last names and select CONFIRM.
Review your names and then select DONE. Your names will now populate on your design.
You may need to adjust the size, number of columns, or the name format to ensure your list fits correctly. See Group List Design Tools below for more information.
Manually add your group list
Select ADD NAMES from the menu.
Enter the first and last names of your group members into the spaces.
You can add more spaces by selecting ADD NAMES.
Remove any excess spaces using the X icon.
You will not be able to submit your order if you have left any first name, last name spaces blank.
Review your names and then select DONE. Your names will now populate on your design.
You may need to adjust the size, number of columns, or the name format to ensure your list fits correctly. See Group List Design Tools below for more information.
Group List Design Tools
Name format
Choose how each name in the list is displayed. If you have a large number of names or longer names, we recommend using either first name initial or last name initial.
Sort order
Select the order in which your names are displayed.
Number of columns
Adjust how many columns your names are split into. If you have a large number of names, we recommend you use four or five columns and scale the list down to fit the decoration area.
Colour
Select the colour used to print your names. Note that some fabrics have more colours available than others. If you are designing on a reversible product, we recommend adding the group list on the spray side to maximise your colour options.
Application type
Your application type will be automatically set to Heat Transfer Printing unless you have designed on the spray side of a reversible garment, in which case the application type will be Sublimation.
Please note group lists are not available on all materials or decoration spaces
Maximum names
Currently, a maximum of 300 names per list is allowed, although multiple lists may be added.